
Camera Settings Guide
- Preston
- Jan 10, 2024
- 10 min read
Updated: Jan 10, 2024

First piece of advice for this lighting situation is… don’t shoot in it if you can help it. Making people look good with shadows under their eyes while squinting can be a real sticking point. But sometimes (hopefully only sometimes), you’re not in charge and you have to work with what you’re given.
Keep in mind where your light source is coming from and use reflected light to fill in some of the heavy contrast. This will help you to make the most of that midday blaze. Once you’ve dialed in your camera settings, hold your hand up to the light and see how it falls. Are there shadows between your fingers? Is there a color reflected in the highlights? Little clues like this can be really helpful in getting accustomed to the slight changes of light. It’s best to keep the sun behind your subject as much as you can. Obviously this isn’t possible right at noon but on either side of midday it is (don’t forget to spot-expose for their faces).

We love a romantic bokeh and creamy background, so we think that starting at f/2 is great. But if you’re wrangling a big group of people together for a family photo or your subjects are standing at different distances from your camera, you’ll want a deeper depth of field (like f/11 or f/14) to make sure everyone’s smile is in focus.
A good place to start with your shutter speed while shooting in full sun is 1/2000+ But you could go faster like 1/4000 in order to accommodate for a wider aperture like f/1.4. Motion blur is a tough one to accomplish in full sun situations unless you have a lens filter limiting the amount of light into your camera, but you might be able to crack it at 50 ISO and f/22.
Make sure your ISO is set anywhere from 50-200. Set your ISO to the lowest it’ll go when shooting in full sun. There is so much light to play with at this hour, and the lower the ISO, the higher the quality of your final image.
Manually set white balance anywhere from kelvin 5000-6500. The kind of light you get in the middle of the day is just above the mid-range on the scale, and this temperature should match the external light perfectly. Depending on what’s in the rest of your photograph, you’ll want to opt for a higher kelvin for warmer light and a lower kelvin for cooler light.

Even light across your subjects is the silver lining of a cloudy day. When taking photos indoors, the way the light pours in through windows can make for some pretty incredible and intimate images. The subtle difference between front-light, side-light, and backlight can be hard to perceive. When it’s overcast, shadows on the skin can tend to look murky. Indoors, front-lit subjects look luminous. Photographing in shade or natural indoor light is definitely a whole lot easier than in full sun, but despite how much more wiggle-room you have in your settings on an overcast day, there are still tricks to remember to make the most of the conditions available to you.
An f/stop of 2.0 will render beautifully sharp subjects set against a soft background. Just make sure, when photographing multiple people, that you bump it up a stop for each extra person.

Having your shutter at around 1/350 will give you the leeway you need to make sure that your other settings are in balance. It’s slow enough to allow enough light in, and fast enough to let you keep your aperture open. This speed makes sure you don’t have any accidental motion blur from your subjects walking towards you or fixing their hair but also cuts out any opportunity for movement in water or pirouette turns. Artistic license either way is completely yours.
You’ll most likely want your ISO to be between 200-600. Closer to 200 on a mid-day cloudy shoot day, and closer to 600 on an afternoon spent in a house with small windows. The lower the number, the less sensitive the sensor, and therefore the better suited for brighter lighting scenarios.
Setting your white balance to around 5000-7000. 5000 will help match the cooler grey of an overcast day or light bouncing in through an open window. The higher the number, the warmer the light. If you’re shooting in a house with orange walls or red hardwood floors, the light refracted throughout the room will warm things up a bit and you might want to aim for a ‘higher’ kelvin, like 7000.

Golden hour is the golden child of all the magic hours. There’s something about this time of day that has the effect of making the plain look beautiful, radiant in the kind of light that triggers little tugs on your heart strings. Maybe it’s magic, or maybe it’s biology, but what we do know is that it triggers nostalgia, happiness, and all the warm fuzzies.
It’s probably obvious by now that we’re a fan of the 2.0 f-stop for couples sessions or portraits. What can we say? Just a sucker for a creamy background and all of the romance that comes with it. If you prefer more in focus, it’s your show. Bump it up to f/5.6 or more for a sharper background and for groups.
Starting with your shutter at about 1/250+ gives you enough light through the lens to be able to capture your subject and properly expose the skin tones so they glow.

If you’re looking to freeze a playful water fight or textures of fabric in motion, you might want to bump it up to 1/500. And if the opposite is true, and you want super soft ocean waves in the background, you could slow it down to around 1/100.
Depending on whether you’re shooting on an open beach or underneath a canopy of evergreens, you’ll want your ISO to be at the lowest possible setting whilst also matching the amount of light in your environment. See if you can get away with 100 ISO and work your way up from there.
Set your white balance to anywhere between 4000-7000 to get you the warm colors you’re after, and don’t you dare think about shooting in Auto White Balance mode for this one! At least not until we teach the little smart computers in our cameras to appreciate the magic of beauty. At the moment, they’re just programmed to understand that the golden hues of sunset need to be balanced out with a little blue. And that’ s not what we want. If you want a really golden sunset, up your kelvin. But if you want it more true to tone, keep it closer to 4000.

Aptly and deceptively named Blue Hour, this period of twilight in the evening just before dark or just before the first breath of light spills over the skyline each morning happens when the sun is deep below the horizon. The soft sunlight that refracts and diffuses through the atmosphere at these times takes on a predominantly blue hue, casting a wonderful luminosity onto your subjects. The deceptive thing about it is that it often lasts for a frustratingly fleeting amount of time (less than an hour). So if you’re hoping to capture the dreamy, ethereal qualities that Blue Hour has to offer, you have to be savvy and quick.
Setting your f/stop to 2.0 helps you make the most out of the limited light available during this time, and allows you to have an ISO that doesn’t compromise too much of the final quality of your image. Work your way up towards f/5.6 (if the light allows) for family or group shots.

Unless you’re chasing motion blur, having your minimum shutter at 1/250 is a great starting point for crisp focus on faces, hands, and all the little important details that add beautiful layers of personality to your photograph. If you’re shooting in extra low light, slowing the shutter down to 1/100 will give you a bit more room to play with, as long as you’re not running around after sugar-fueled four year old's.
The light during blue hour changes so rapidly that we’ve had to give you a pretty wide ISO range to compensate. Depending on where you are and what time it is, you’ll likely want to have your camera settings tuned to the 500-1500 range. This is pretty high, so in some cameras your images will turn out a little grainy, but know that is normal. In the first few minutes of blue hour, the sky will be brighter than towards late twilight, so keep in mind that you might have to change settings midway through the shoot. Our advice would be to expose for the mid-tones. The diffused light during blue hour pulls the highlights and the shadows into the same range. So with a pushed ISO, metering for the mid-tones allows you to hold onto the detail in the highlights while also keeping the texture of the shadows.
Because you don’t want the color balance neutralizing the luminous blues of this time of day, set your white balance between 5000-7000 to capture the soft light of this magic hour. As always, creative control is all yours. If you want your photographs to look a little bluer, set your Kelvin closer to the 5000 mark. Want the tones evened out a bit? Set it closer to 7500. As with ISO, you might want to change your settings halfway through the shoot depending on how much warmth is refracted off the clouds.

Shooting in low light can be a daunting undertaking for new photographers. But the warm, flickering light of hundreds of candles during a wedding reception can trigger nostalgia in even the most stoic of viewers. That’s why getting it right is so important! So turn off your flash, eliminate as many other sources of light as you can, and steady your hand. Because shooting in this lighting scenario requires patience, practice, and a little dash of courage.
Start with dialing in your aperture to f/2.0 (or even lower like f/1.8 or f/1.4). Shooting in such dim light forces your hand towards super wide apertures, but hey! We love a beautiful bokeh in the background anyway, so this works. When shooting with such low apertures, it's extra important to use spot focusing to make sure your subjects stay the star of the show.

Ideally, your shutter would be sitting somewhere around the 1/200+ mark, but in some cases, you’ll need to slow it down to 1/60. You can take it even slower to 1/15th of a second, but a tripod would be necessary. If you’re shooting people at that speed, you’ll need to give them very special instructions to stay as still as possible. If you don’t, you will end up with portraits with soft edges and potentially some motion blur, which is perfectly fine, if that’s what you want! The results can be surprising all the same.
You’ll need a very light-sensitive sensor in low light, so setting your ISO to 1500-2500 is a great place to begin. With such a high ISO, your images will likely have a bit of noise to them, so it’s best to try for as low of an ISO as possible within this range. Sometimes, this graininess can contribute to a vintage-style film look, and other times, it can appear as if the quality has been compromised. If this is the case, you could attempt to reduce the noise in Lightroom or Photoshop.
Candlelight is inherently warm. In fact, the actual temperature of a candle flame is 1900 Kelvin. But in order to keep the warmth of the image without the camera over-correcting for the tonal range, set your white balance from 2000-5000. 2000 if you’re after truer colors, and 5000 if you’re looking to exercise more of your creative control and accentuate the warmth of the candle-lit room.
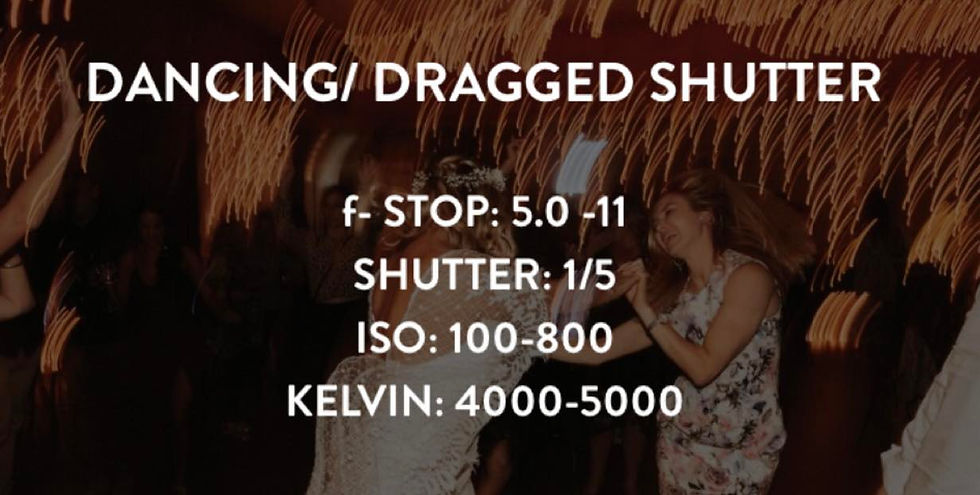
Having a boogie late into the night with the bride and groom? Dragging your shutter (frequently called long exposure) can be just the technique you need on the journey. It’s great for capturing the fun on the dance floor whilst still preserving some of the background details.
Having a smaller aperture, anywhere from f/5.0 to f/11 allows you to capture your footloose and fancy-free guests without losing the mood lighting or character-filled details of the venue around them.
How slow can ya go? With a flash, you have a bit more freedom in how slow you can set your shutter speed. For this lighting technique, we suggest you start at 1/5. This will give you lots of time to shake your camera around for some fun creative light swirls that achieve creative light trails and trigger pleasant party flashbacks for your clients.

Depending on how bright your flash is and how dark the venue is, you’ll want to set your ISO in the 100-800 range. If your subjects are generally pretty close to the camera, you’ll be able to get away with a lower ISO as the flash will be illuminating them pretty effectively. But if they’re further away, and you’re trying to get more of the background details in with a super small aperture, then you will probably lean towards the 800 mark.
Here is something we bet you wish you knew when you first started shooting at night: the longer you have your shutter open, the more your camera will record orange-ish tungsten light. Generally, that’s fine, because a warm cast over your photos tends to make the viewer feel a little nostalgic. It's hard to say exactly why. So for your dancing photos, setting your white balance around the 4000-5000 mark should work a treat. If you want them warmer, go for 5000. Cooler, 4000.

After you’ve navigated your way through all of the last-minute changes to schedules, variable lighting scenarios, and all of the silly requests from tipsy revelers… enter the sparkler exit. This lighting scenario is a beautiful display of light and fire, but be ready to deal with the occasional wayward spark (and maybe skip the flammable hairspray)! Scope the path your guests will take, have your camera at the ready, and dial in your settings. We recommend using natural ambient light to capture the natural glow of the sparklers, but if you have to push the ISO or the shutter speed the point where everyone in the crowd becomes a blurry ghost, use a lumen cube pointed at the couple or bounce a flash off a nearby wall. Here’s where we think you should start:
Having your aperture wide open allows for the most light to come in, giving you a bit more wiggle room with shutter speed, and allowing you to set your ISO to the lowest setting possible. Use spot focus, and set your aperture to f/1.4-f/2.5 for best results.
If you’re not using a tripod and you’re hoping to get some definition in the sparks that come flying off the sparklers waving around in people’s hands, set your shutter to 1/125. A bit faster and you’ll get more of the individual sparks. Slower, you’ll get more of a streak effect.
When shooting at night without a flash, you’ll need a pretty high ISO, from 2000-6000. If you’re using a flash or a lumen cube, set your ISO to 400. Having a higher ISO without adding to the existing lighting allows you to have the faster shutter speed you need to capture all of the sparks flying through the air.
Manually setting your Kelvin from 2000-5000 will give you consistently better balanced images. If you choose to set it on the lower end of the scale, expect bluer, more true-to-life color tones. If you choose to set it closer to the 5000 mark, your images will be warmer and more reminiscent of the softness of candle light.


Comments